
Every ServiceNow admin/dev should have a good documentation workflow in general, even more so when they are creating or exposing APIs. In fact, most would say that an API is only as good as the documentation that is provided. I’m sure anyone who has tried to consume a badly documented API would quickly agree!
What
This post is a walk-through of my API documentation workflow in ServiceNow. I don’t make claims to this being the best practice. I also acknowledge that others have created great in-platform tools that do similar things, but I do it this way ¯\_(ツ)_/¯.
When
Do some form of API documentation whenever you create a scripted REST API or send someone to a NOW API (such as a table API). Yes, existing documentation might exist for NOW APIs, and yes, the REST Explorer API exists, but there are still benefits to doing your own documentation:
- Discrete. You can focus on exactly what you want the user to be attempting to do when consuming your API
- Externally accessible. External consumers might not have access to the REST API Explorer
- Shareable. Consumers can run your examples quickly via Postman.
How
Before we start
I’ve set up an example Scripted REST API in my personal developer instance, where a consumer can:
- Get the total amount of incident records (and can provide an optional query)
- Get the latest incident’s short description
- Create an incident via query parameters
- Create an incident via JSON object
Now I want to provide API documentation. In my process workflow, I use Postman, most developers who work with APIs know what this application is, but if you don’t, go here and download/install it. As a benefit, this walkthrough will also teach you some basics in Postman.
Collections in Postman

First create a new collection by clicking the “Collections” tab and then selecting “+ New Collection” and give it a name that describes what the API provides in general (you can even match your Scripted REST API name) and a description (if you want).
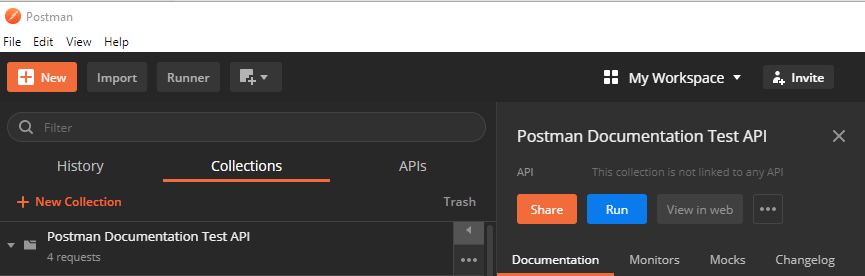
Once created, you’re going to hover over the collection and click the right arrow that appears. In the new menu, select “View in web” to make Postman open your collection in your browser.
(At some point, Postman will want you to make an account, you will need to do this eventually in this process workflow so just do so when it prompts you.)
In your browser, on the top right you will see a button that says “Publish”, click that. Follow the instructions and decide on some configurations (I typically disable collection discovery so that it doesn’t appear in public listings). When you’re done, click “Publish Collection”.
Once published, you will see a link to “public documentation” or if you go back to the “View on web” step, you can click on the green “Published” button and click on the “This collection is published at:” link. Copy that URL and let’s take a quick detour back to ServiceNow.
For Scripted REST APIs: Providing the documentation link
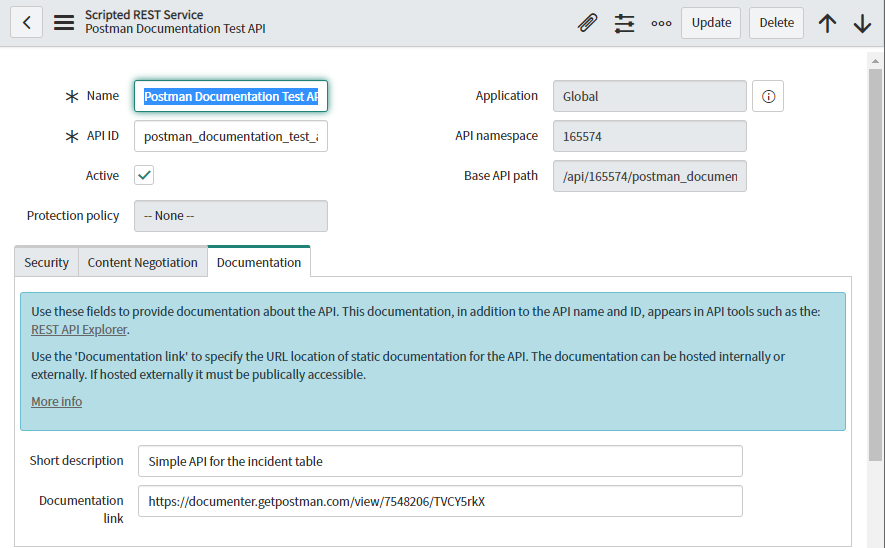
Navigate to your scripted REST API and paste the URL to the documentation field. This link appears on the REST API Explorer and if clicked on by the user will send them to the documentation you have built.
Bonus Points: I’ve seen some users create an Application Navigator module link (URL Arguments type with target _blank since it’s an external site) just for these kind of documents, if you think users will need to access it a lot!
Creating endpoints in your documentation
Getting back to Postman, let’s start building Postman API endpoints. I’m going to walkthrough creating one for our “Get the total amount of incident records (and can provide an optional query)” example.
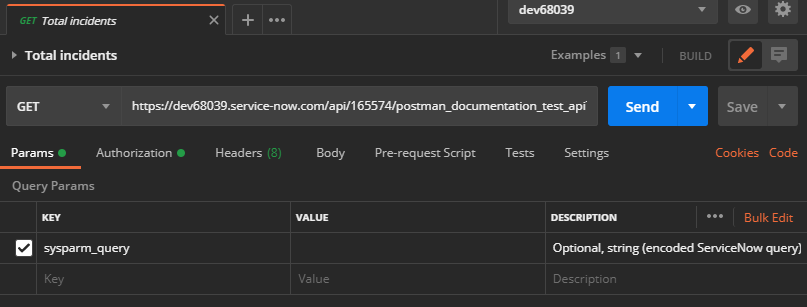
- First, in the main window of Postman click the plus (+) icon to create a new Untitled Request.
- Rename the title accordingly (eg. Total Incidents) and if you want, give it a description of what this endpoint does.
- Choose “GET” (though it should have defaulted to GET).
- Type in your endpoint (leave out any query parameters).
- In the “Params” tab and “Query Params” section, type in a key and value.
- Be sure to give a good description to every key-value pair you enter in Postman. At a minimum, always include if it is Required or Optional, what format it should be (string, integer, etc.), and a description of what it does when provided (and/or the default value that it takes when when not provided!).
Our example looks like this:
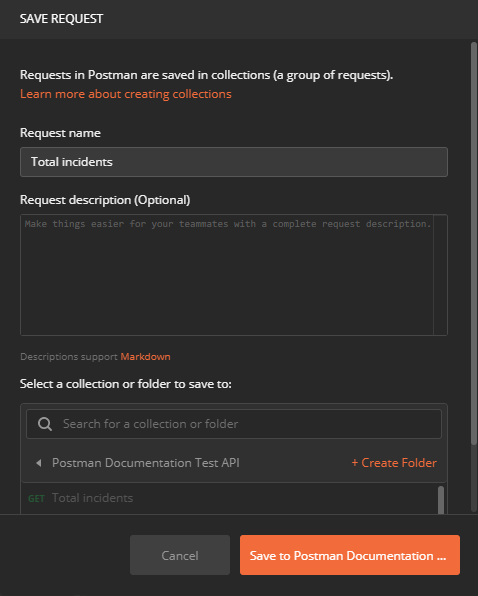
Don’t worry about sending it right now, but rather, next to the send button, click the save dropdown arrow and click “Save As…”.
In the Save Request window, under “Select a collection or folder to save to:” select the collection you created earlier. When done, select “Save to Postman Documentation”
Run in Postman
Now, do you still have that “public documentation” link from earlier? Try going to it now and you’ll see that the documentation has been updated to reflect your new request endpoint!

One of the biggest benefits of doing API documenation through Postman is that anyone who has access to the documentation, will be able to click “Run in Postman” and their Postman will open up with the exact set-up that you just made so that they can immediately start running tests and designing their system’s requests and response handling!
Security in Postman
Did you try sending the request yet? Try now. You’ll likely receive the following error:
{
    "error": {
        "detail": "Required to provide Auth information",
        "message": "User Not Authenticated"
    },
    "status": "failure"
}
That’s entirely because most APIs (especially in ServiceNow) require a user to login/authenticate, so let’s talk about that now. But before telling you how to authenticate, I have to talk to you about security.
Remember the “Run in Postman” button? Because of it, if you were to plug in a username and password into this request and save it, whenever someone presses “Run in Postman” it will load that too! This is generally a no-no due to security reasons, but can also be a good thing for specific use-cases:
- The authentication details is to an account that is intentionally quarantined to specific testing data
- The endpoints themselves are for a testing environment that can withstand random API requests
Otherwise, you’re going to want to follow this process so that you don’t upload secure credential information:
In postman, click the cog wheel on the top right to open the Manage Environments menu. Click on Add to start creating a new environment (for this purpose, think of an environment as a private stash of items that are just for you/your instance).
Name the environment (I name mine based on the instance and the persona. eg. my PDI name and my test account profile). Create two variables, one called username and one called password. You can leave the “Initial Values” as blank. In the “Current value” column, put the username and password you will be using to authenticate the endpoint. It should look like this:
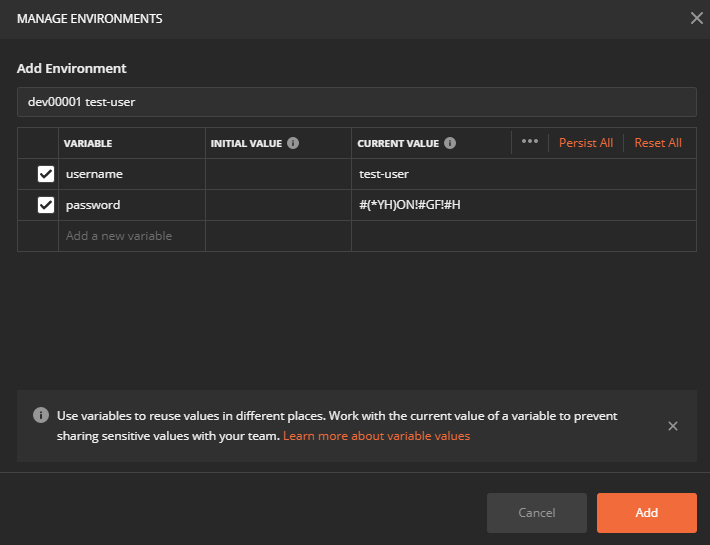
In case you want to know, initial value is the value that is saved as the permanent value for that variable for this environment. The current value is the temporary value. If you were to ever share this environment to another Postman user, they would have access to the initial value but the current value would be wiped. If a current value is missing, it defaults to the initial value.
Alright, let’s get authenticated.
Authenticating your request
On your requests Authorization tab, change the type to your desired authentication method (in our example, we are using Basic Auth).
Now if you created an environment earlier with variables, all you need to do now is type: {{username}} for the Username and {{password}} for the password and it will subtitute the private values in for you. Save your endpoint (so that the documentation updates to show what authorization is needed). And now, try sending your request and see if you get through.
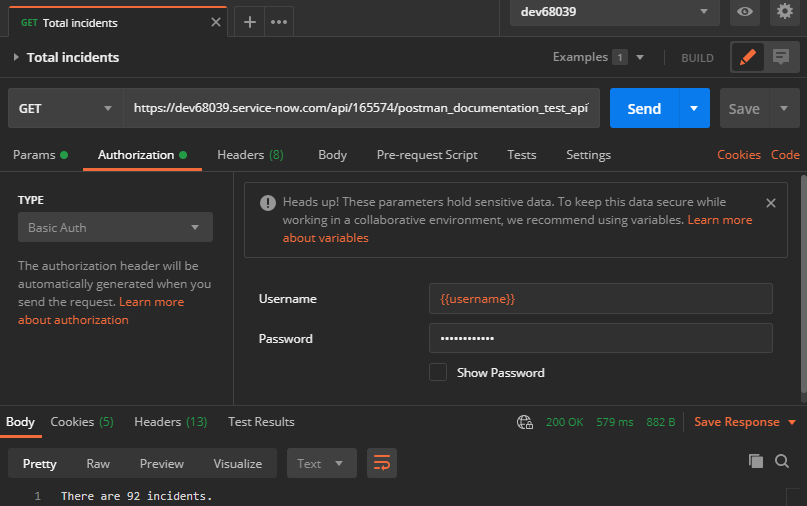
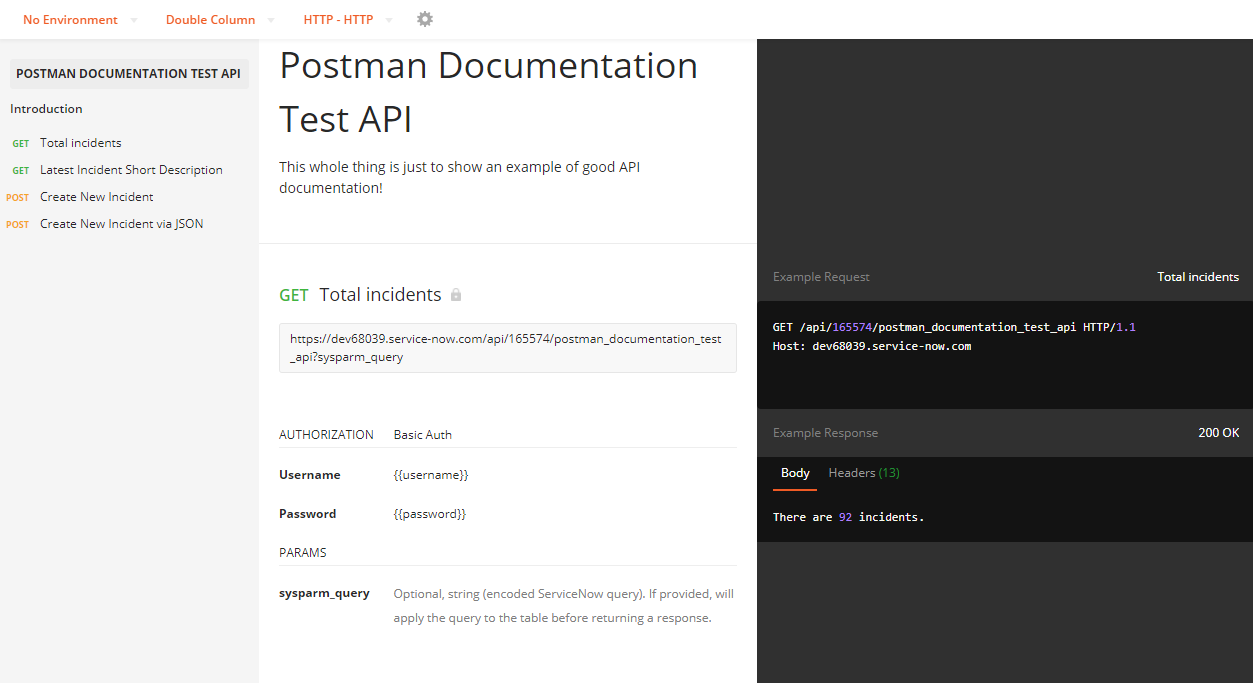
At the bottom of the screenshot, you can see a 200 OK status and an expected response… Success!
But wait, don’t close that window just yet!
Save example responses!
In the response section (the bottom half) of your request, there is a “Save Response” button, if you click that and choose “Save as Example” a new tab will open up with a complete breakdown of the response. Click “Save Example” and close the tab.
Now if you go back to your public documentation, you will see that the example response is provided for the endpoint!

Remember that APIs are only as good as their documentation! Example responses are just as helpful as example requests, as it lets developers start creating response handlers even before they gain access to your API/system.
Create more requests
In new tabs, repeat this process of creating new requests and saving them to your collection to continue building your API documentation. Here are some additional things to keep in mind:
- Do the same thing for Headers that you did for Params: Explain what’s required, optional, value type, etc.
- Include an example body in your request, especially if it’s required.
- This is an overview, did I miss something that you need in Postman? I’m sure google will know!
- Remember security
- Provide example responses
Results
That’s it! If you want to see the end-result of the documentation I made for this walkthrough/tutorial you can find it here: https://documenter.getpostman.com/view/7548206/TVCY5rkX#58e7a9cc-2b13-4554-8290-0f66c861eab0